|
Convert
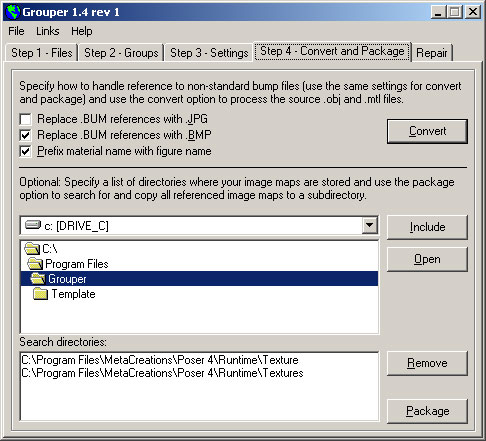
The Convert option processes the source .OBJ file and saves
the result to the destination file you specified in the Step
1 - Files tab. The checkboxes control whether the Convert option
changes the .BUM extension to .JPG or .BMP during the conversion
process.
You can also have the Convert option make the material name
more descriptive by adding the figure name.
Package
The Package option scans the .MTL file and generates a list
of referenced texture and bump maps, it then searches the directories
you specified and copies just those texture and bump maps into
a subdirectory eliminating the need to browse the ...\Runtime
directory for file locations during import to your rendering
application.
Use the Include option to add directories to the search list,
use the Remove option to delete directories from the list. In
most cases, this will be the ...\Poser\Runtime\Textures directory.
A few details on how the Package option searches for files:
- The Package option searches the directories you specify
and all subdirectories under them so you don't need to specify
each subdirectory in the ...\Runtime\Textures directory.
- The Package option copies the first file it finds whose
filename matches the filename referenced in the .MTL file.
If you have multiple copies of the same file, only the first
one Grouper encounters will be copied.
- If the destination subdirectory already exists from a previous
run, the Package option searches that first. If the file it
is looking for has already been copied, it does not search
the directories you specify and moves on to the next file
in the list.
- The Package option respects the .BUM to .BMP and .BUM to
.JPG checkboxes in the Conversion section. If you check the
"Replace .BUM references with .JPG" checkbox, it
will search for a .JPG file. If you checked the "Replace
.BUM with .BMP" checkbox it will search for a .BUM file
but copy it to the destination directory as a .BMP file.
- You should use the same .BUM processing options for both
the Convert and Package options.
For compatibility, the Convert option does not point references
in the .MTL file to the texture and bump map subdirectory.
The Dirty Little Secret
Some Poser models specify bump maps with the .BUM extension
however, most rendering applications don't recognize the .BUM
extension. Under the Windows family of operating systems,
.BUM files are actually in the same binary file format as
.BMP files. If your Poser model came with a .BUM file you
can simply change the extension to .BMP and most rendering
applications will import it without any problems.
Grouper allows you to bypass this nuisance entirely by checking
"Replace .BUM references with .BMP". During conversion,
any bump files with the .BUM extension will be changed to
.BMP. During packaging, Grouper will search for a .BUM file
but copy it as a .BMP file.
If you checked the "Convert .BUM references to .JPG",
Grouper will assume that you've created a .JPG file somewhere
within the search directory space.
If, after searching the entire directory space you specified,
the Package option does not find a file that is referenced in
the .MTL file, it will notify you of the missing file(s) at
the end of the search.
Some applications like Carrara recognize full path names in
a .MTL file. Bryce however, only recognizes relative paths.
Because different rendering applications handle the .MTL file
differently, Grouper does not add path information to the converted
.MTL file. After using the Convert and Package options, move
the grouped destination .OBJ and .MTL files into the package
directory to avoid missing file dialogs in your rendering application.
Use the Open option to explore the selected directory.
Home
| Back
|
