Overview
If you're interested in using Bryce to create photo-realistic
images you may have run into the situation where you've finished
a scene, taken great care with the objects, textures and lighting,
but the finished result just doesn't quite "look"
right. Sometimes this is simply a perception.
The eye perceives a particular field of view when viewing
a natural landscape and expects to see certain proportions
and angles in an image created with traditional photographic
equipment. The expectation is a completely learned response
from a lifetime of examples. Compare a photograph taken with
a 35mm camera to one taken of exactly the same subject at
exactly the same time by a digital camera. Digital cameras
are a relatively new invention and use different optics than
traditional photographic equipment. When I look at these two
images, 40 years of experience makes me perceive the digital
image as different.
Photographers have also developed certain practices to compensate
for the limitations of the equipment available to them. In
some cases, they will deliberately distort an image to achieve
a particular style or mood. As an example, I've always admired
the work of Ansel Adams but there is little chance of me recreating
his style with a 35mm camera even if I managed to master all
of the other artistic elements of his work.
The end result is that if you don't present the eye with
what it expects to see, your finished image may quietly "look"
wrong. Fortunately the Bryce render engine has the ability
to precisely recreate these proportions, it's just a matter
of knowing what the eye expects.
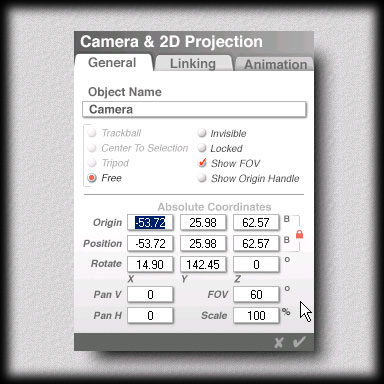
Field of View
The field of view value is set in decimal degrees but you're
probably more familiar with the field of view of a particular
lens. The default value is 60 degrees and that corresponds
to a wide angle lens. A sensible enough default for an application
that was originally intended to create images of natural landscapes.
If you remember a little geometry and have a pocket calculator
you can work out the angles exactly.
For the 35mm format the exposed film area is:
h = 24mm

w = 36mm

d = sqrt( w^2 + h^2)

  = 43.27mm
f = focal length of the lens in mm
horizontal angle of view = 2 * arctan (w/(2*f))

vertical angle of view   = 2 * arctan (h/(2*f))

diagonal angle of view   = 2 * arctan (d/(2*f))
Convert radians to degress:
degrees = 180 * radians / pi
|
The reference table lists some common lenses and their angle
of view for the 35mm format. Find the lens you want to reproduce
on the left and enter the decimal value from the (Horizontal)
column in the FOV field of the camera dialog.
|
f
(mm) |
Angle of View (degrees) |
(Apparent
Zoom) |
|
(Horizontal)
|
(Vertical)
|
(Diagonal)
|
| Wide Angle |
7 |
137.4990
|
119.4871
|
144.1394
|
0.33
|
| 8 |
132.0750
|
112.6199
|
139.4112
|
0.34
|
| 14 |
104.2500
|
81.2026
|
114.1821
|
0.44
|
| 15 |
100.3889
|
77.3196
|
110.5270
|
0.45
|
| 16 |
96.7329
|
73.7398
|
107.0267
|
0.47
|
| 17 |
93.2732
|
70.4352
|
103.6777
|
0.49
|
| 20 |
83.9744
|
61.9275
|
94.4932
|
0.54
|
| 24 |
73.7398
|
53.1301
|
84.0622
|
0.62
|
| 28 |
65.4705
|
46.3972
|
75.3806
|
0.69
|
| 35 |
54.4322
|
37.8493
|
63.4400
|
0.83
|
| Normal |
43 |
45.4288
|
31.1856
|
53.4140
|
1.00
|
| 50 |
39.5978
|
26.9915
|
46.7930
|
1.15
|
| 55 |
36.2437
|
24.6160
|
42.9427
|
1.25
|
| Telephoto |
85 |
23.9132
|
16.0714
|
28.5583
|
1.90
|
| 100 |
20.4079
|
13.6855
|
24.4137
|
2.23
|
| 135 |
15.1893
|
10.1592
|
18.2081
|
2.99
|
| 150 |
13.6855
|
9.1478
|
16.4135
|
3.32
|
| 200 |
10.2855
|
6.8673
|
12.3470
|
4.42
|
| 300 |
6.8673
|
4.5812
|
8.2490
|
6.62
|
| 400 |
5.1531
|
3.4367
|
6.1915
|
8.82
|
| 600 |
3.4367
|
2.2915
|
4.1299
|
13.22
|
| 800 |
2.5779
|
1.7187
|
3.0980
|
17.62
|
| 1000 |
2.0624
|
1.3750
|
2.4786
|
22.03
|
| 1200 |
1.7187
|
1.1459
|
2.0656
|
26.43
|
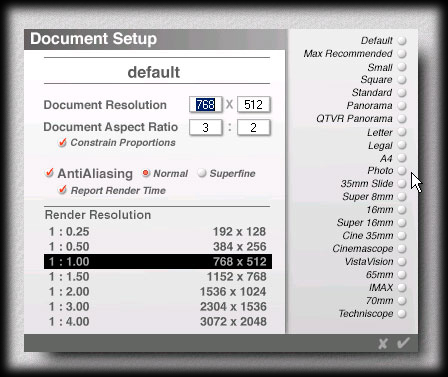
Document Aspect
Since you can only set the horizontal field of view you need
to adjust the vertical field of view indirectly by changing
the document's aspect ratio. In the 35mm film format, the
exposed film area is 36mm wide by 24mm high or 3:2. Match
the aspect ratio in the document dialog by setting the aspect
ratio directly or click on the Photo button.
Printing
If the final image is to be printed, you need to be aware
of the document resolution as well. For images destined for
the web, simply choose a convenient size.
I use two print services. I like Shutterfly
for prints up to 8x10 because their process (near as I can
tell) creates a continuous tone image. For larger prints I
use ez
prints because their quality is excellent and they offer
larger format prints.
Crop or Fit
When you print you may have to crop the image depending on
the final size.
| Format |
Aspect Ratio |
|
| 36mm x 24mm |
1.5 |
 |
| 4 x 6 |
1.5 |
|
| 5 x 7 |
1.4 |
 |
| 8 x 10 |
1.25 |
 |
The gray areas show how the original image will be cropped.
This isn't a problem since both the film image and the virtual
image will be cropped in the same manner.
Print services will generally give you the option of cropping
or fitting (stretching) the image to match the final print
size. While you'll lose some of the image with cropping, always
select this option because it maintains a uniform scale.
Document Resolution
Both services I use give the best results with an image resolution
of 100 to 150dpi, with the file uploaded in the maximum quality
JPEG format. You can send higher resolutions or use
better file formats but you won't be able to see the difference
and one way or another it'll be more expensive.
If we take the 8x10 print as an example, we know the image
will be cropped on the left and right sides. To make sure
we'll have enough resolution in the height direction we use
that dimension to calculate our Bryce document size.
8 inches x 110 dots per inch = 880 dots (pixels)
high
880 pixels x 3 / 2 = 1320 pixels wide
Since we're throwing away pixels on the left and right sides
when we crop the image we need to compensate by increasing the
width. If we used the width to determine the resolution we would
only have about 92dpi after cropping.
An easy way to remember is to always use the dimension adjacent
to the crop line to determine the document resolution.
Color Corrections, Models, Gamma and Gamut
One thing to remember about any Internet print service is that
they are most commonly used to print images taken by amateur
photographers. They will typically apply some additional processing
to an image before printing that you need to keep in mind.
Always check with the service to see if they do any automatic
color correction. If they do, include a note along with the
order instructing them to disable the automatic color correction
before they print the image.
Sometimes people worry about the differences between the RGB
and CYMK color models. If you're generating an image to be run
on by an offset printing process, by all means, check with the
printer. But for printing Bryce images with an Internet print
service you generally don't need to concern yourself with such
details. Services are used to receiving images in RGB format
from digital cameras. If any conversion is necessary, they'll
do that automatically.
Make sure your monitor is properly calibrated so that the image
will print as expected. If you're using a Mac, be aware that
your monitor's gamma correction will almost certainly make the
printed image appear washed out if you're not careful. Before
you order a large print, try ordering a smaller proof just to
check the color and make the appropriate adjustments. Be careful
to make sure that the proof will be printed on the same equipment
as the full version.
Bryce is capable of generating a wider range of colors than
most printing methods can reproduce. It's always a good idea
to load the final image in an application like Photoshop and
check for gamut warnings before you order. Here again, a proof
can be very helpful.
Common Practices
Professional photographers commonly use different equipment
and techniques for different situations. In general, the more
you know about traditional photographic methods, the easier
it will be to create photo-realistic images in Bryce.
Texts on these techniques are widely available online and at
your local book store so I won't try to duplicate them here.
Rather, in this series of tutorials, I'll focus on specific
techniques and how they can be reproduced in Bryce.
As usual, send questions and comments to toad@castironflamingo.com.
|